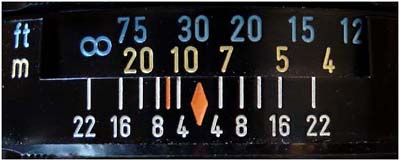
Well, make a blue UV mark like that usually to find red IR mark on your lens and find the right position by refocusing your lens for sharp UV focus. Best works for me to shoot with that lens from a tripod to a meter scale on the ground. The magnified display sometimes is enough to find that point of max. sharpness, but actually processing the images gives a much higher precision.
The coarse first step...
I take a visual reference shot at position 0 and then UV shots at 0, 4, 8, 11, 16 and find out which one gets closest to the visual reference shot.

[DOF scale (c) fineart-photography.com]
Now just select the sharpest focus point and you're about done. Repeat for various focusing distances - it may not be the same result. I found that blue UV mark for that lens was around the 11 marking. (And before someone asks, if there are no such markings - make some.)
Now the fine second step...Usually I overlay the visible and the UV image to see the actual focus difference and to see if my solution was correct or if still more adjustment is needed. It is an iterative, time consuming process actually, as it has to be done for different distances, so some patience is needed.
during adjustment, still 1mm to go:

after correct adjustment:

And that was the precise result (top:VIS, middle:UV, bottom VIS overlayed w. UV; focus point was at 12.5mm)

So the blue UV mark ended somewhere between the 11 and 16 marking for that specific lens.
And here now some real results using that lens, now correctly calibrated for UV:
VIS:

UV:

VIS:

UV:

Same method applied to a 4/200mm Nikon lens, left VIS, right after UV calibration: [in that case the blue UV mark had to be way off the IR mark...]
infinity:

medium distance:

close distance:

That later lens works best in UV at short to medium distances, but not really that impressive at infinity, caused by its lens design.
Stay tuned, more will follow on that fascinating subject...
More info on this very interesting field may be found on my site http://www.pbase.com/kds315/uv_photos
