Showing posts with label leakage. Show all posts

Tuesday, December 11, 2018

Baader-U Venus filter versus OPTOLONG Venus-U filter

Today about a new (to me) UV transmitting filter for reflected ultraviolet (UV) photography: the 2" OPTOLONG VENUS-U filter. This filter I have compared here with my work-horse UV filter, the 2" Baader-U Venus filter.

First it is about the resulting images and of course if there might be any IR leakage. The latter is quite important, as in early morning or late evening sunlight, where IR is predominant or when shooting against the sun or when reflective elements are present in an image,  IR leakage may lead to loss of contrast, or even obscuring the wanted UV details.

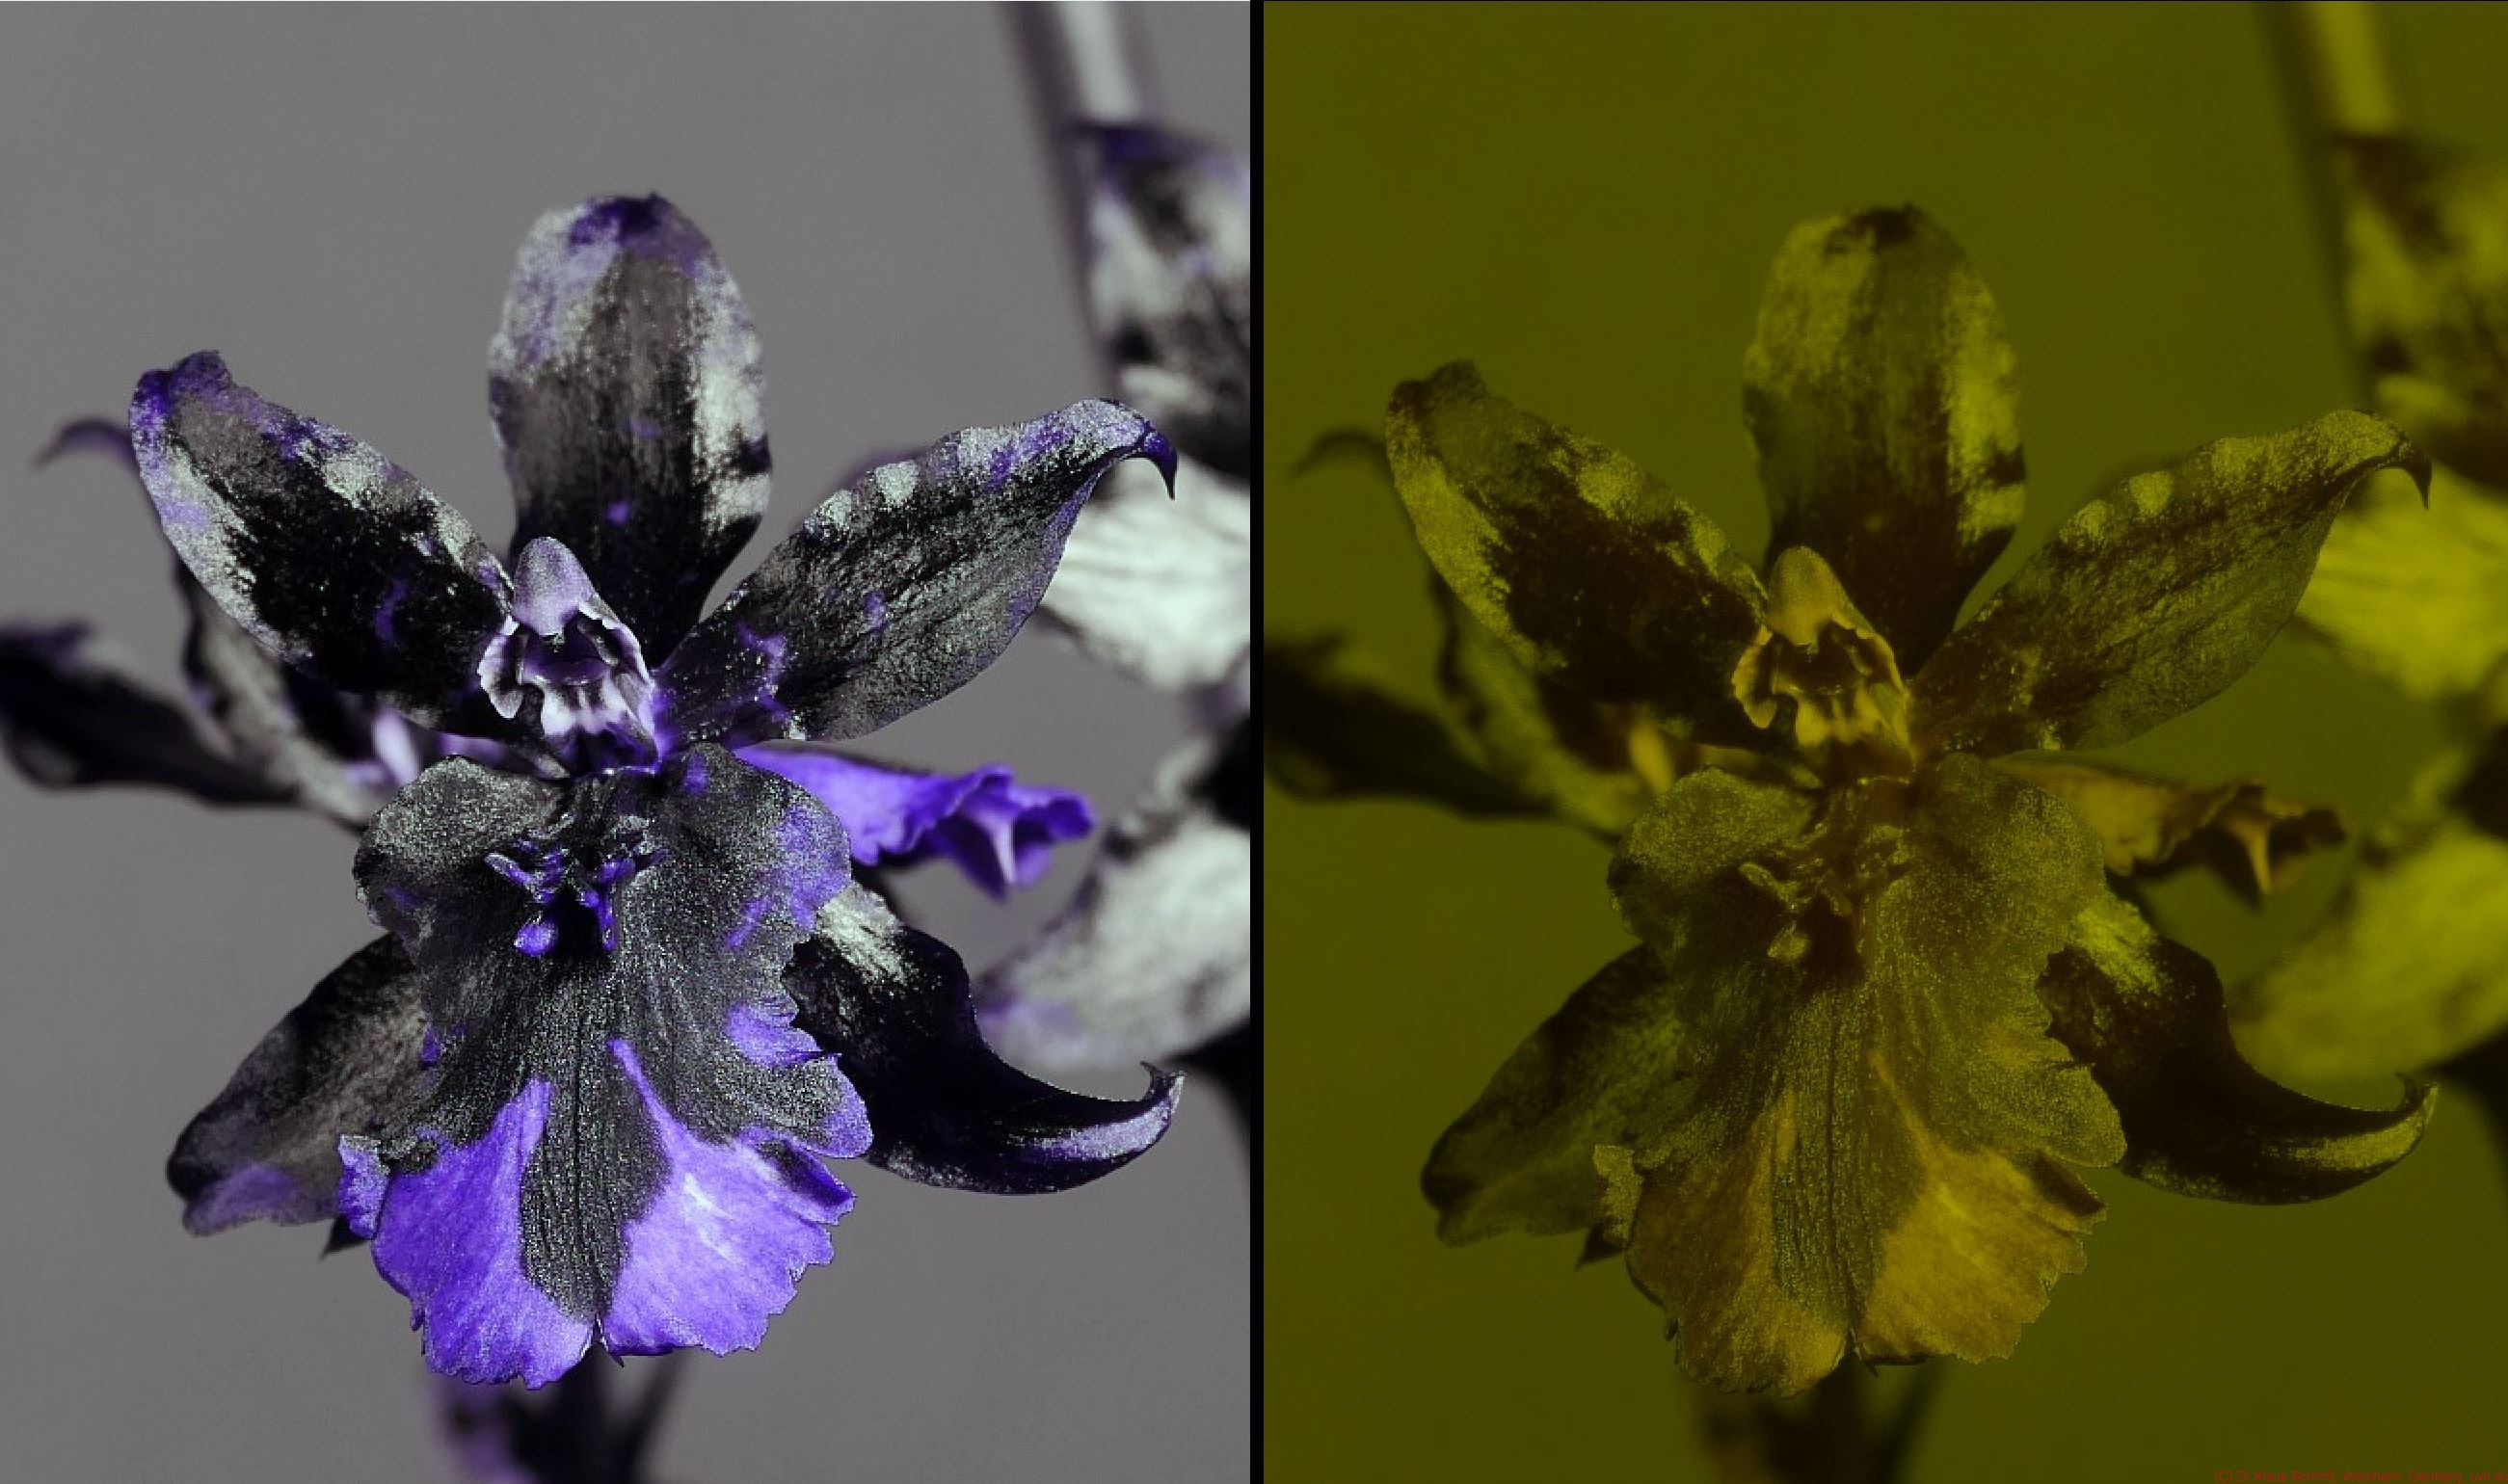
Now on to my tests which have been done using as a target an Oncostele orchid which has quite some prominent UV marks. Lens used was an UV-Nikkor 105mm, camera a modified Panasonic GH4, light a modified for high UV output Xenon studio flash. All shots were one at f8.

[click on image to see a larger one]

Baader-U filter (left) vs Optolong Venus filter (right:

Baader-U filter (left) vs Optolong Venus filter (right) - whitebalanced against gray BG:


It gets quite obvious that there is something going on here in terms of leakage, as the image shot with the Optolong Venus filter shows some blueish hint visible all over the orchid and also there is some central flare visible, wheras the Baader-U Venusfilter delivers a tack sharp and high contrast image. After whitebalacing against the gray background, which obviously was not possible with the Optolong filter, the result gets even worse, a rather muddy looking image results from the Optolong filter. In terms of exposure, the Baader U filter also has a slight 0.3 stop advantage over the Optolong filter.

Once I will have done some spectrometric transmission measuerements, I will certainly post those here later.

So please draw your own conclusions from this, if you would consider this a valuable filter for reflected UV photography. I will certainly continue to use my "work-horse" UV filter, the Baader-U.

I have written about IR leakage in filters for reflected UV photography HERE

Stay tuned, more will follow on that fascinating subject...

More info on this very interesting field may be found on my site http://www.pbase.com/kds315/uv_photos

Tuesday, July 15, 2014

Flare reduction and sunshade use in reflected UV ultraviolet photography

Today about flare redction when shooting reflected UV and the dedicated UV transmitting filters, like the Baader-U filter, my "work horse", for that. I'm using here my CERCO 94mm quartz fluorite lens, but in principle this method is applicable for any such lens. However, keep in mind, that quartz fluorite lenses for reflected UV are often single or even uncoated or show hotspotting, so it gets even more important to control flare efficiently, resulting in much higher image contrast and sometimes even removal of the hotspot. All images have been done at identical manual exposure settings, which were tested for correct exposure upfront.

Similar methods using such hoods have been used by others, I'm not claiming anything here, this just documents what I have done to further optimize my own setup.

[click on image to see a larger one]

Test images at nearly infinity (left to right) using (optimized for my camera's sensor size, other sensor sizes will require different sizes)
1) just the UV filter, no sunshade at all
2) a 40mm long sunshade with 50mm free diameter
3) a 50mm long sunshade with 21mm free diameter


The difference gets quite obvious, the longer and narrower the sunshade is, the better flare gets controlled.

Now some closeup shots, using the same method and sequence:

Also here shooting flowers at closeup, it gets pretty obvious, how much flare is present if using no or a simple sunshade, whereas a specilized deep and narrow sunshade results in much improved flare control, hence greatly improved image contrast.

Let me summarize:
Whenever shooting reflected UV (or other multispectral work), make sure to use the deepest and most narrow possible sunshade, that does not vignette, to achieve the best flare control and resulting in best possible image contrast. It is also suitable to control or even remove the effect of hotspots, some of those highly specialized lenses unfortunately show.

I have previously written about filter leakage HERE.

Stay tuned, more will follow on that fascinating subject...

More info on this very interesting field may be found on my site http://www.pbase.com/kds315/uv_photos

Friday, May 9, 2014

Filter leakage in reflected UV ultraviolet photography - How not to test a filter for leakage IV

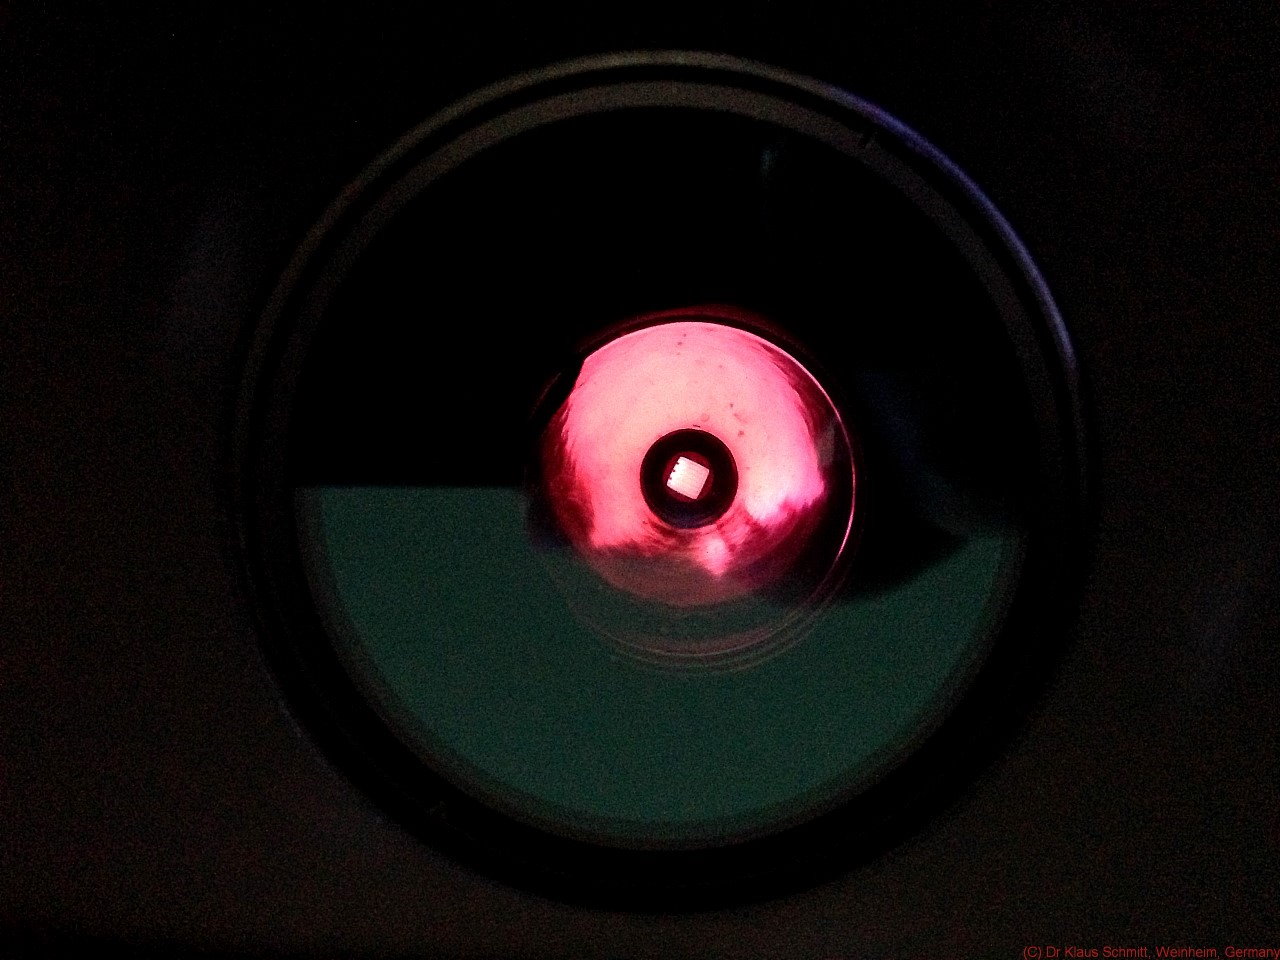
Today about a method to test UV transmitting filters for leakage that should not be used. In priciple the idea seems to be straight forward and quite obvious: Shine a strong white light through an UV transmitting filter (a ionic colored LUV U2 will be used here) and if one (or a camera) "sees" something transmitted, that filter seems to leak. Well, let's have a look if that is really that easy....

[click on image to see a larger one]

What my iPhone5 sees when shining a strong Cree white LED light through a LUV U2 filter:
 
So do I see leakage here? My iphone sees that as red, but I really see violet, so it either depends on the WB used or theremust be something else. It is basically all a matter of intensities, as the filter from what I know and have measured earlier has about OD4 suppression outside the UV range up to NIR, then using a very strong LED torch with an intensity of for instance 10.000 then gives 0.0001 (OD4) x 10000 = 1 and that can be easily recorded.

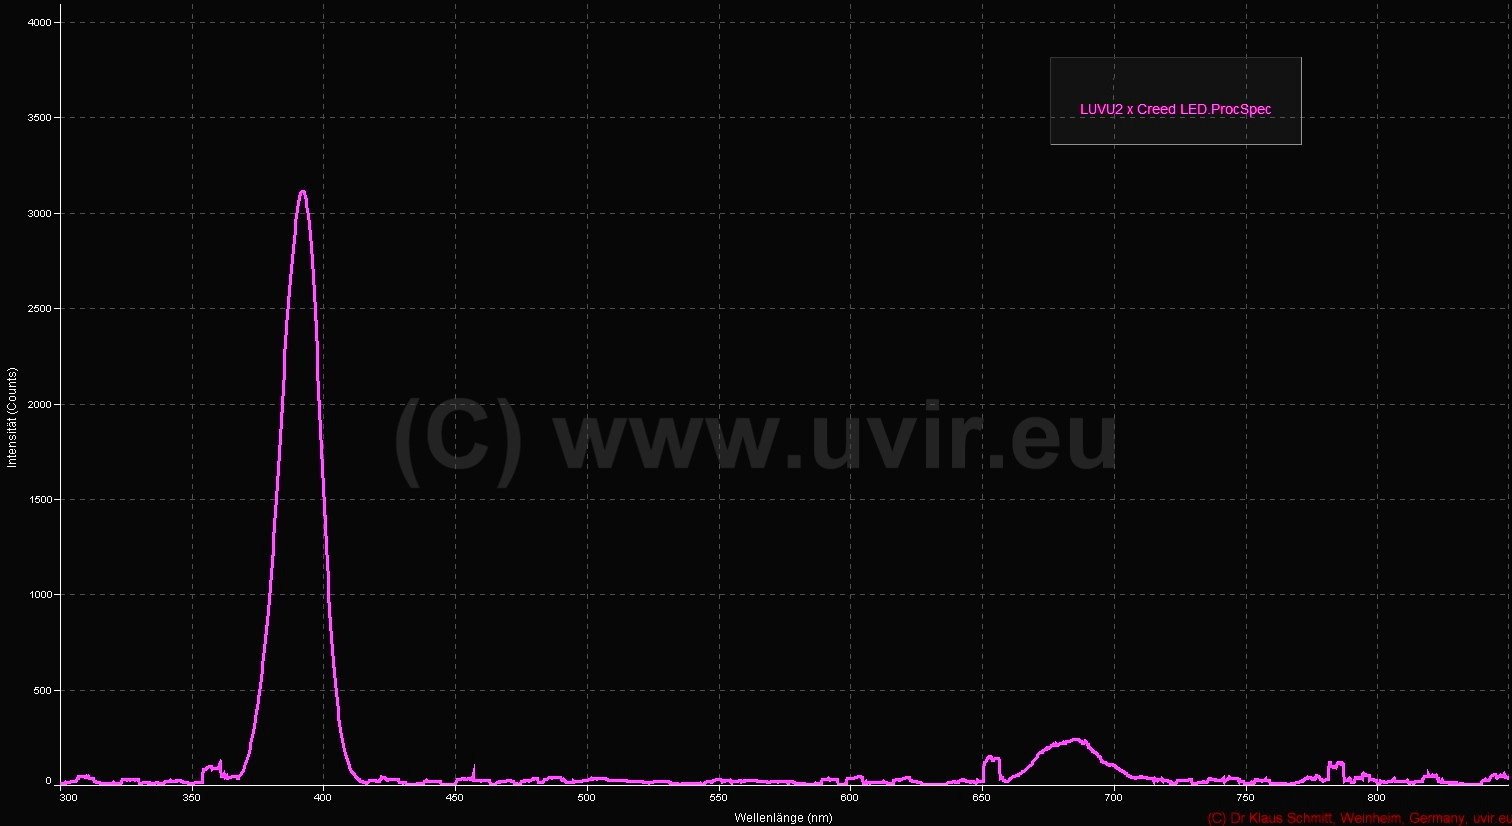
But let's see what my spectrometer system reveals about that same situation:
 
Obviously even that white CREE LED does emit some UV (peaks at 392nm) and there is some red between 650-710nm - that also explains why I see violet, as there is some UV + blue + red. (ignore the ripples, this is just noise caused by the very long integration time).

So what do we see now here in the next image: I have added to the experiment (using the same spectrometer settings) the Cree white LED light w/o that UV transmitting filter shining through 2x ND3 filters, equivalent to using 1x ND6 to reduce that enormous bright light to one my spectrometer can handle:
 
I needed two stacked neutral density ND3 filters (i.e. ND6) to reduce that intensity to a manageable level and to get about the same amount of count at around 670nm. So that means that this Cree LED is so intense, that it is even able to have that internal used phosphor (used to achieve the bright white light) emit some UV and some dark red!

Just to make that clear, ND6 means 1:1.000.000 reduction in intensity, so adjusting my previous example to real data now: if the UV transmitting filter suppresses OD4 (0.0001) and one uses a light with intensity 1.000.000 and shine it through that filter, one would still get 100 intensity counts (or simpler calculated OD6 – OD4 = OD2 equals a factor of 100). BUT in normal photography, one does not have that situation, so this really is irrelevant and renders such "test" useless.

Let me summarize:
I could not detect any IR leakage using the LUV U-2 filter as well as the spectrometric test did not show leakage up to 800nm in my earlier tests. So using a very strong LED torch of unknown properties to shine through such a filter, does not create a suitable and reliable testing method, nor do I recommend to use that. Neither do I recommend to look through such a filter pointing at the sun, as this creates an enormous risk for ones eyesight due to the high UV transmittance!!

I have previously written about filter leakage HERE.

Stay tuned, more will follow on that fascinating subject...

More info on this very interesting field may be found on my site http://www.pbase.com/kds315/uv_photos

Saturday, March 2, 2013

Filter leakage in reflected UV ultraviolet photography - unsuitable UV vs Baader-U filter III

Today again about IR leakage in reflected UV photography and how to deal with it. I have posted about that before here.

So what I wanted to show to today is, how different reflected UV images look like with and without IR leakage, so to enable a potential UV shooter to detect that. Images are presented in a side-a-side waqy, to make comparisons easier.

[click on image to see a larger one]

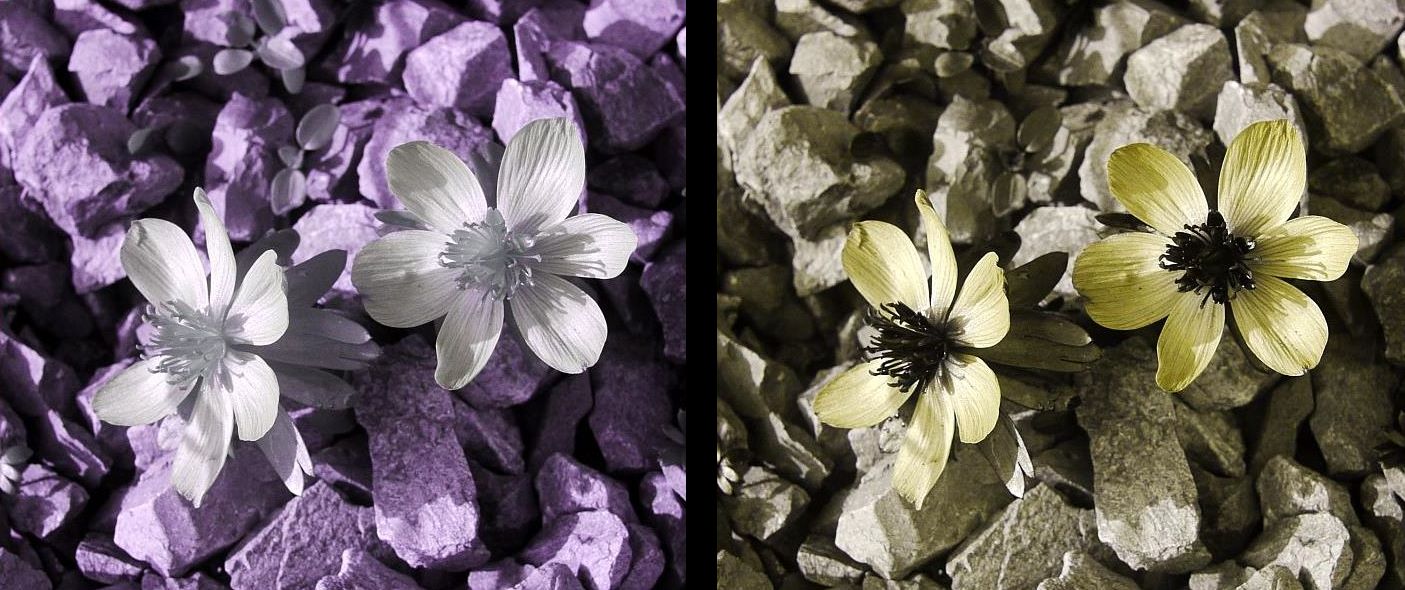
Here now the comparison with a commercially available UV filter, that not only leaks IR but also some blue vs the Baader-U 2" filter, Winter Aconite as target:

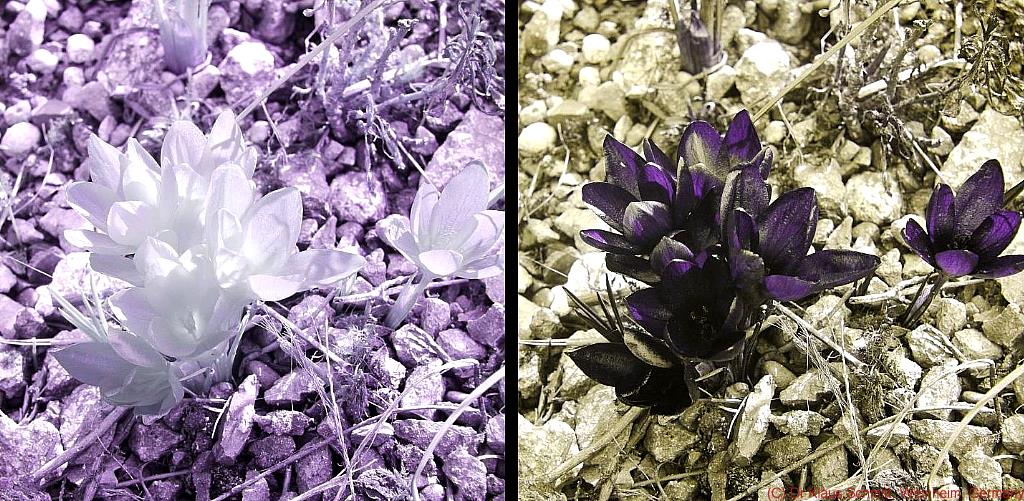
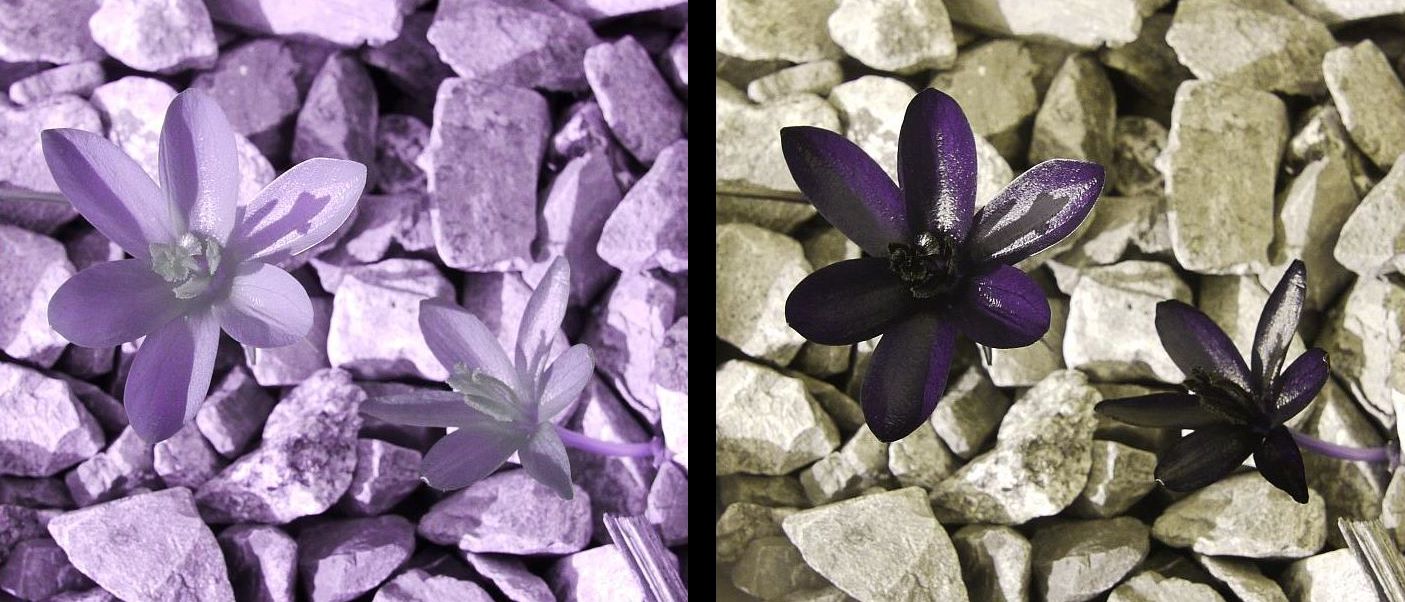
So here another example for very strong IR leakage (left), vs correct UV recording using a Baader-U 2" filter (right) using a strongly IR reflecting spring crocus as a target:


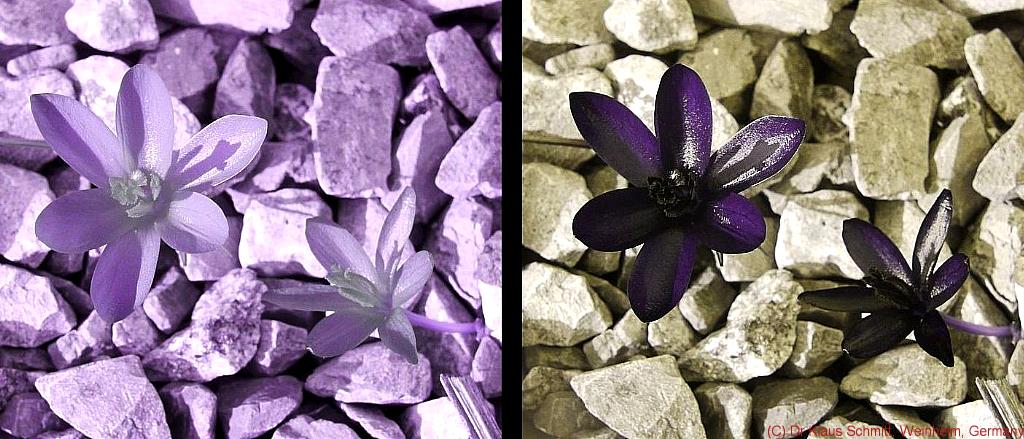
Same situation, but different angle and different crocus:

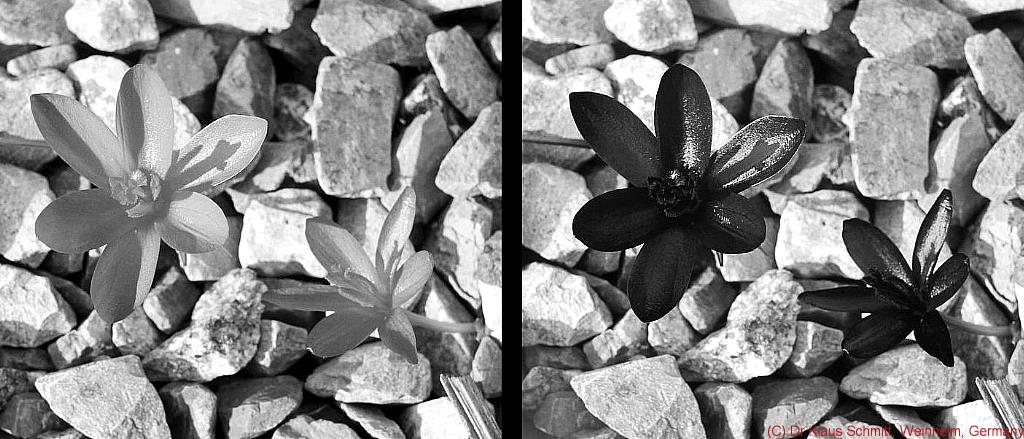
here in bw version, that shows that exposure was identical, but the pattern and structure is completely washed away by that IR leakage::

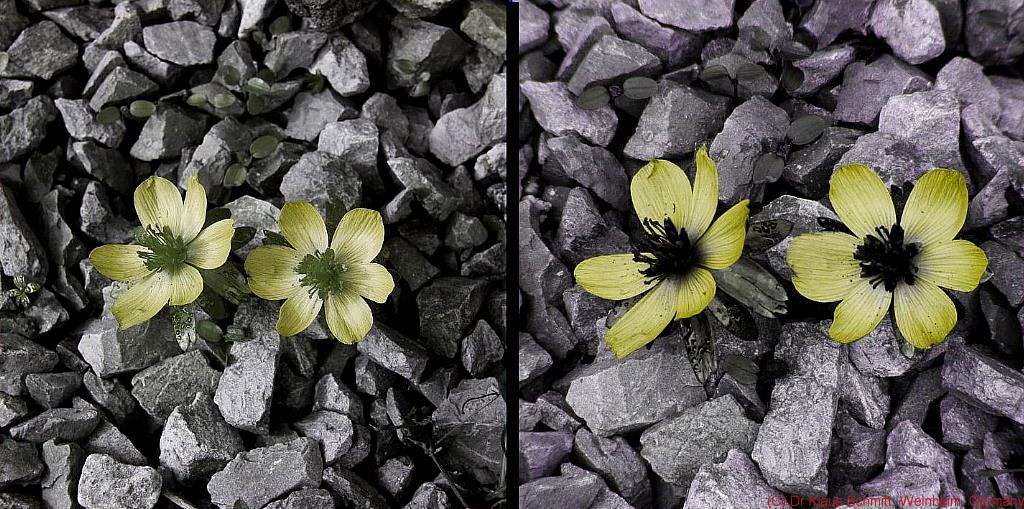
This following last example now shows the results of two different UV transmitting astro filters, left one with just a little IR leakage, but still enough to render the result useless, right the currently best filter for reflected UV in my opinion, the Baader-U 2", again using Winter Aconite as target:


Well, it was my goal to bring the attention to an often overlooked, but very important fact: IR leakage in reflected UV photography. Often beginners try to experiment with cheap UV transmitting filters, hoping to get some useful results. Unfortunately due to the very high IR sensitivity of modern sensors, just the tiny fraction of 0.1% leakage leads to useless results. So there is no way other than using highest quality UV transmission filters to secure useful results. Demand at least a IR suppression of OD3 from any UV transmitting filter, better even OD4!

Stay tuned, more will follow on that fascinating subject...

More info on this very interesting field may be found on my site http://www.pbase.com/kds315/uv_photos

Monday, September 10, 2012

Filter leakage in reflected UV ultraviolet photography - DIY filter vs Baader-U II

Today again about leakage in reflected UV photography and how to deal with it. I have posted about that before here.

I wanted to show here some examples using SCHOTT UG11 in comparison with using IR suppressing SCHOTT S8612 filter glass of different thickness and to show how such IR leakage can be efficiently cured - at least for most normal shooting conditions. In early morning or late evening sunlight, where IR is predominant or when shooting against the sun or when reflective elements are present in an image, that won't work then, sometimes not even when using the otherwise excellent Baader-U filter.

[click on image to see a larger one]

So here an example for strong IR leakage using only 2.5mm SCHOTT UG11:

So how does that picture should look like? Here what the Baader-U filtered result looks like:


And here the result of my shorter wave, IR leak proof Jupiter-U filter:


It is pretty obvious, that IR leakeage virtually destroys the importatnt aspect of that image, as well as it softens the image, i.e. a strong lack of contrast is caused.
So let's see if stacking 1mm of SCHOTT S8612 filter onto the UG11 filter solves the problem:


Nice, but was it enough? Let's see what 2mm of SCHOTT S8612 will bring us:


Much better now, as the contrast is strongly enhanced, the UV pattern on petals is quite nicely present. So what I can recommend is stacking 2mm of SCHOTT S8612 filter glass onto SCHOTT UG1, UG11 UV transmissive filter glass (also works with HOYA U-340), but unfortunately if total cost are taken into account, this is not really far from getting a Baader-U filter...

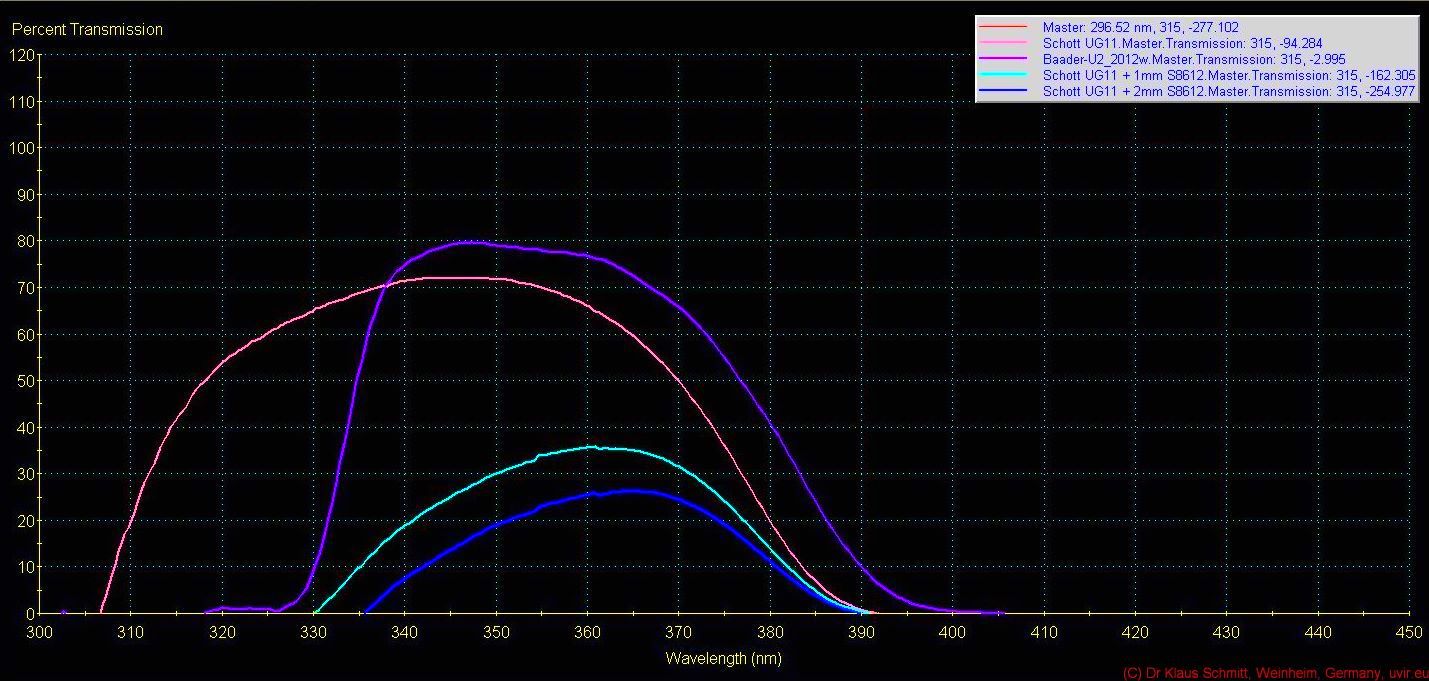
And there is another BUT, the lower overall transmission caused by stacking such filters. Have a look at my measurements here, which clearly shows, that controlling leakage using ionic colored filter glass comes at a considerable transmission loss:


In that case, one of about 1.7 stops mathematically; in real use due to the sensor sensitivity curve, it is less than that, but still a significant one. And I haven't even talked about ghost images when stacking uncoated filters or the reflectance loss of about 8% per filter glass. So company Baader obviously made her homework very well, if you compare the results of the graph above (Baader-U is denoted by the violet line, the SCHOTT UG11 stacked with 2mm SCHOTT S8612 is denoted by the blue line), showing the very high reached UV transmission, rather flat broadband. It does not reach very deep into UV, but most UV sensitive cameras will anyway not be able to reach that deep and/or when using normal glass based lenses, where even the best of those barely reach beyond 330nm.

CAVEAT: on 2nd thought there seems to be something wrong with these S8612 filters I got from a US filter making company, as the resulting UV transmission is much lower than expected when compared to results of the SCHOTT filter calculation software. In principle only the UV transmission seems to be affected, not the leakage suppressing part, so the made statements are all valid, except the possible 1.7 stop loss. I will update about that here, as soon as I have found out about it. Btw. SCHOTT BG40 may be used as a replacement for S8612, but needs about double the thickness.
UPDATE as of 09-2012: As it turns out, these S8612 filters were cladded on both sides using some optical glass (B270) to prevent them from graying (an oxidation process this S8612 filter glass type shows) and this cladding has been attached to the S8612 using some UV cured adhesive. Most likely that B270 glass used and/or the used adhesive absorb UV more than expected, hence leading to the results measured above. So if you would like to use S8612 filter glass, make sure you get uncladded filters (and have to accept the fact that it may over the years need repolishing).


There is a newer part III about IR leakage in UV photography here.

Stay tuned, more will follow on that fascinating subject...

More info on this very interesting field may be found on my site http://www.pbase.com/kds315/uv_photos

Thursday, August 2, 2012

Filter leakage in reflected UV ultraviolet photography - DIY filter vs Baader-U

Today about leakage in reflected UV photography and how to detect it. When I started many years ago, non-UV leakage effects in supposedly purely reflected UV photography was a big issue before the now "standard" UV transmission filter, the Baader-U filter was brought to the market by the company Baader-Planaterium, Germany based on intensive research of astronomer Mr Thomas Baader, who combined Schott filter glass with a multilayered, dichroic overcoating to suppress IR leakage. The method before was using for instance filter stacks consisting of a IR leaking UV filter, SCHOTT UG1 or UG11, plus IR suppressing SCHOTT S8612, BG38 or BG40 filter glass. The downside was, that the suppression was far from being optimal and under certain shooting conditions one could get massive IR leakage. It takes a bit of experience to see that though and even today one can see a lot of such supposedly "UV images", but basically it is a mix of UV and near IR (NIR), if not often nearly purely NIR.

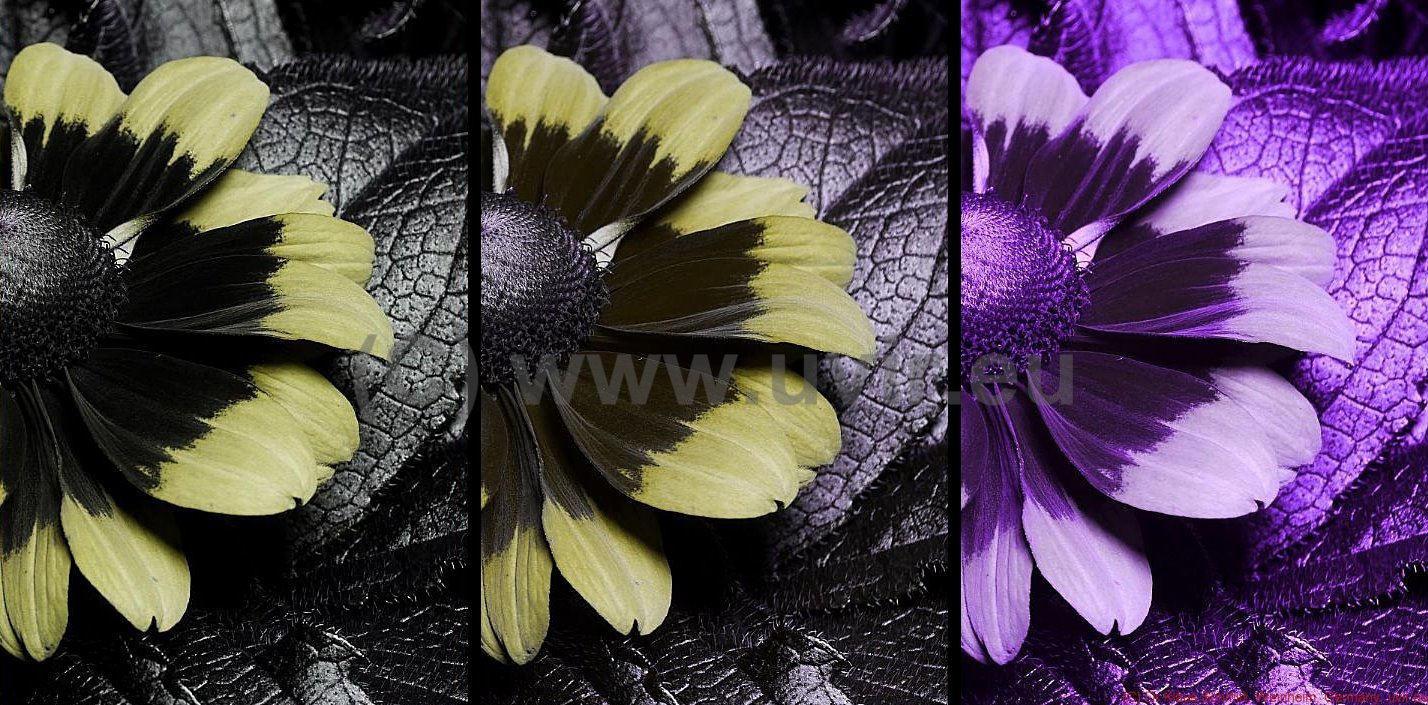
So how does a contaminated UV image look like? A first indication is that non UV reflecting parts (of a flower), that should look very dark, appeared lightened up. A good example to test is Rudbeckia (R. hirta was used here), as it has nearly completely UV absorbing petals in its lower petal parts towards the center, wheras the petal tips are very UV bright. My spectrometric research has confirmed that many times for different Rudbeckia species. Here an example for that:
[click on image to see a larger one]
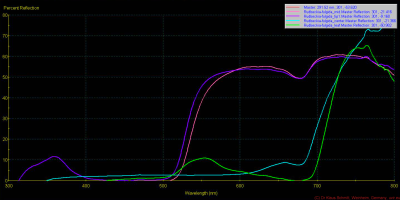

Its gets pretty obvious, that the petal mid and base have very low reflection (pink line), wheras the petal tip (lilac line) has quite a UV reflection peak around 365nm. Now have a look at the right side of the graph, the visible (VIS) and near infrared (NIR) part of that spectra, from approx. 520nm onwards the reflection rapidly gets quite high, approaching some 50-60%). So any filter, that does not perfectly block these non-UV parts will show leakage i.e. flower parts that should be (very) dark will appear lightened up. Here an example for that:


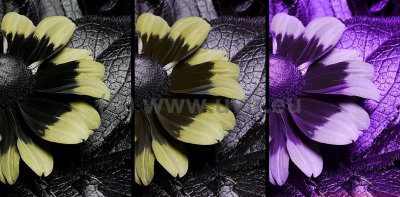
Left shows the Baader-U filter used, middle and right show the results of using more (right) or less (middle) leaking UV filter stacks, here based on SCHOTT UG11 filter glass and a S8612 blocking filter glass (two different thicknesses were used, 2mm for the middle and 1mm for the right image). The flower petal parts that should be very dark, appear in a brownish red. [btw. stacking the two 1mm + 2mm S8612 filters onto the UG11 filter solves the problem, another proof for the leakage]

Remark: the actual color is irrelevant, as based on the whitebalance used, it could be basically any color. Important only is the intensity of these petal parts, which should be quite low, but isn't. Here another example for that, again Baader-U was used on the left image, middle and right are filter stacks (it is the same image, just differently white balanced).

Here another example, this time a Hemerocallis (Day Lily), left Baader-U, right a leaking filter stack was used:
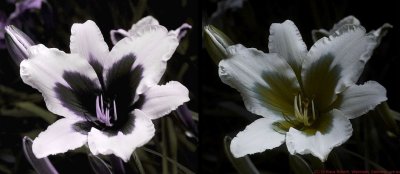

All these images were shot using my UV camera and a flat, beyond 300nm transmitting CERCO f4.1/94mm quartz fluorite lens.

These filter stacks work basically the following way, explained using SCHOTT's filter calculation program for a similar filter stack. The obvious weakness for that case is around 700nm:
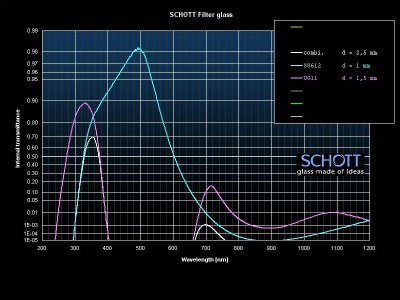
[courtesy and (c) SCHOTT]

So, be aware of these effects when assembling your own filter, or buying commercially available filters, as you may end up with useless "UV images", but they may look interesting nevertheless ;)

A hint and a simple explanation: a classic transmission chart of a filter in 0-100% linear scale does not show possible leakage issues. The exposure difference between UV photography and VIS/NIR photography is in the range of 8-12 exposure stops more for UV, so if a filter transmits in the VIS or NIR region more than OD3 (1E-03 or 0.001) it will most likely leak, since 10 stops equal a factor of 1024 i.e. 2exp(10), so 1/1024 = 0.001 that means a normal exposed UV image at -10EV and one through a filter that transmits 0.001 will be about equally exposed. But 0.1% in a linear 0-100% chart is pretty impossible to see, or can you see it here?
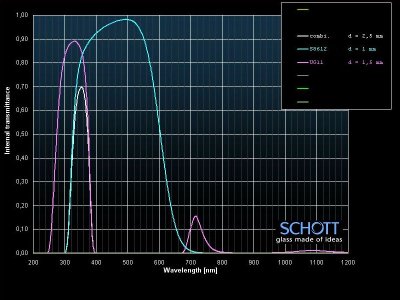
[courtesy and (c) SCHOTT]

It is the same example as shown above, just in the usually presented linear graph, so be aware.

There is a continuation of this article HERE.

Stay tuned, more will follow on that fascinating subject...

More info on this very interesting field may be found on my site http://www.pbase.com/kds315/uv_photos

Saturday, March 3, 2012

[UV] IR leakage and how to avoid it

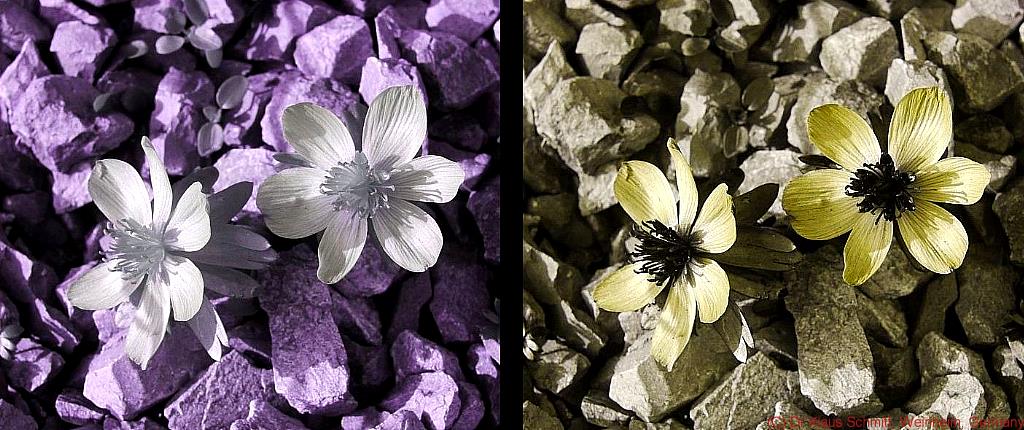
One of the most important issues to take care of in reflected UV photography is to avoid IR leakage. Here and example why this is the case.

[click on image to see a larger one]

This left image shows massive IR leakage, whereas the one on the right has none and properly shows the black flower center on this Winter Aconite.


and crocus (which is highly IR reflective) here:


The key is avoiding situations with strong sunlight, using a suitable sunhood and especially using the right UV transmission filter, the new 2" Baader U filter in this case, which has a very good IR suppression up to 1100nm. I had already written about that fact in my article: Principle Thoughts about Lenses + Filters for UV


Stay tuned, more will follow on that fascinating subject...

More info on this very interesting field may be found on my site http://www.pbase.com/kds315/uv_photos